
Growing tomatoes in an Aerogarden is a great way to get a head start on your summer garden. Transplanting Aerogarden tomato plants to an outdoor garden is a great way to get an even bigger harvest.
This article will provide instructions on how to properly transplant Aerogarden tomato plants to an outdoor garden. It will cover topics such as soil preparation, planting, and caring for the transplanted plants. With the right techniques, you can successfully transplant Aerogarden tomato plants and enjoy a bountiful harvest.
Preparing the Aerogarden
The Aerogarden is the perfect gardening tool for those who don’t have a green thumb or the time to tend to a traditional garden. With its automated watering system and built-in grow lights, the Aerogarden allows you to grow a variety of plants indoors any time of year.
Preparing the Aerogarden is simple and straightforward, allowing you to start growing your favorite herbs, vegetables, and flowers in no time. First, assemble the Aerogarden and add the nutrient-rich pre-seeded Grow Pods. Plug the Aerogarden in and fill the reservoir with cold water.
Turn the Aerogarden on and it will automatically begin to water and grow your plants. With minimal effort and time, you can enjoy the benefits of home-grown produce or beautiful flowers. Get ready to harvest your own garden bounty with the Aerogarden!
Choosing the Right Container for Transplanting
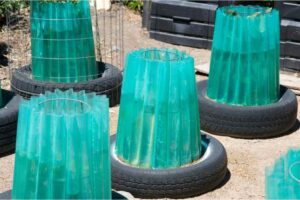
When it comes to transplanting plants, the container you choose is just as important as the plant itself. It’s essential to pick a container that is the right size, shape, and material for the specific type of plant you’re transplanting.
To get the most out of your gardening efforts, it’s important to research and select the ideal container. This means finding a container that allows for adequate drainage, has enough space for the root system to grow, and is made of a material that will not harm the plant. With the right container, you’ll be able to successfully transplant plants and ensure their long-term health and growth.
Preparing the Soil for Transplanting
Transplanting plants is an essential part of gardening, but it can also be the most daunting. Before transplanting, it’s important to prepare the soil so the new plant has the best chance for success. Soil preparation requires loosening the soil and removing any weeds and debris.
Adding organic matter, such as compost, will also help to ensure the soil is rich and healthy for the new plant. Doing this will help the plant develop a strong root system and healthy foliage. Transplanting can be a scary process, but with the right preparation, your plants will have the best chance for success.

Transplanting the Tomato Plant
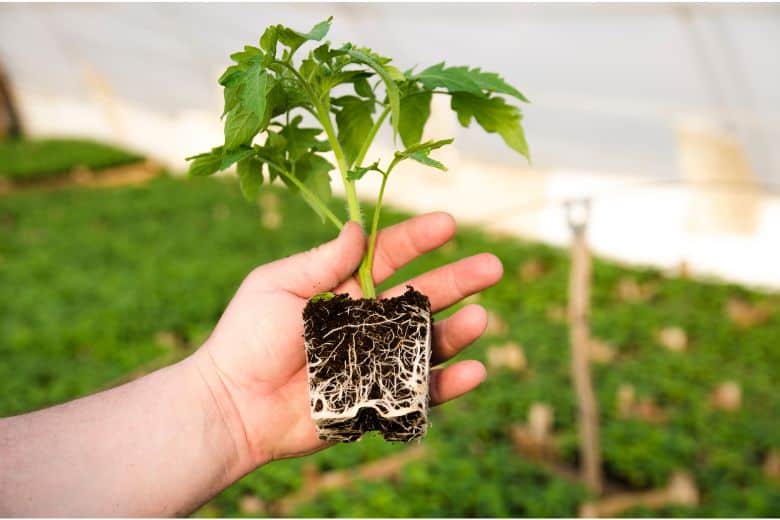
Tomatoes are one of the most popular garden plants, and transplanting your tomato plant can be an easy and rewarding experience. Transplanting is the process of moving a plant from its current pot or garden bed into a new one. Taking the time to properly transplant your tomato plant will help it to grow and produce more fruit.
When transplanting, it’s important to choose the right pot size and soil to ensure your tomato plant is properly nourished and can access the nutrients it needs.
Additionally, it’s important to carefully dig around the root system of the plant to protect it from damage during the transplanting process. With the right knowledge and supplies, you’ll have a healthy and fruitful tomato plant in no time.
Caring for the Transplanted Tomato Plant
Taking care of a transplanted tomato plant can be a rewarding experience, if done right. It is important to create a warm and moist environment for your tomato plant to thrive. Plant your tomato in a sunny area, preferably in an area with 8 hours of direct sunlight. Make sure you water your tomato deeply and frequently, allowing the soil to dry out slightly between watering.
Fertilize your tomato plant with a balanced fertilizer, such as an all-purpose or tomato-specific fertilizer, every two weeks. Prune your tomato plant to contain its size and shape, and to promote healthy growth. Remove any diseased or yellowed leaves to prevent the spread of disease.
Lastly, mulch around your tomato to help conserve moisture and keep weeds at bay. With just a little effort, your transplanted tomato plant will be producing delicious tomatoes before you know it!
Troubleshooting Common Problems
Please keep in mind that these solutions are based on typical problems and may not apply to all situations.
1. Germination Failure
If your tomato plants are not germinating:
- Make sure the pods are properly inserted into the Aerogarden.
- Check the temperature. Tomato seeds usually germinate at temperatures between 60-85°F (15-29°C).
- Confirm you have fresh seeds. Older seeds may have a lower germination rate.
2. Yellowing Leaves
When you notice yellowing leaves:
- Check the nutrient levels. Tomatoes are heavy feeders and may require more nutrients than what is typically provided.
- Assess the watering schedule. Overwatering can cause yellowing leaves.
- Monitor light exposure. Too much light can cause the leaves to yellow and die.
3. Wilting or Drooping
For plants that are wilting or drooping:
- Look at the water quality. Hard water or water with high mineral content can cause plant stress.
- Inspect the roots. Root rot can cause wilting.
- Make sure the room temperature is appropriate. Too hot or too cold can cause wilting.
4. Slow Growth
If your tomato plants are growing slower than expected:
- Check light exposure. Tomatoes require a lot of light for healthy growth.
- Adjust the nutrient levels. Insufficient nutrients can lead to slow growth.
- Keep an eye on the plant’s spacing. Overcrowded plants can compete for resources, slowing growth.
5. Fruit Not Setting
In the event that your tomato plant is not setting fruit:
- Consider manually pollinating the flowers using a small brush.
- Check the temperature. Extreme temperatures can prevent fruit set.
- Be patient. Sometimes it just takes a bit longer for fruit to set.
6. Diseased Plants
To address diseases:
- Regularly check your plants for signs of disease like unusual spots, discoloration, or deformation.
- Remove any infected plants or leaves to prevent the spread.
- Clean your Aerogarden unit between plantings to minimize disease risk.
7. Pest Problems
If you encounter pests:
- Identify the pest. Different pests require different control measures.
- Remove any pests you see manually, if possible.
- Consider using a safe insecticide or organic solution like neem oil to control pests.
Each Aerogarden system and plant can have unique needs and issues. Always consult your user manual or reach out to Aerogarden support for additional guidance.
FAQs About the How To Transplant Aerogarden Tomato Plants
What is the best time of year to transplant Aerogarden tomato plants?
Answer: The best time of year to transplant Aerogarden tomato plants is in early spring, when the soil temperature is between 60 and 70 degrees Fahrenheit.
How deep should the new pot or garden bed be for transplanting Aerogarden tomato plants?
Answer: The new pot or garden bed should be at least 8 inches deep to provide adequate space for the roots of the tomato plants.
How often should I water Aerogarden tomato plants after transplanting?
Answer: Water your tomato plants immediately after transplanting and then check the soil daily to see if it needs additional water. The amount of water needed will depend on the size of the pot or garden bed, the soil type and the climate.
Conclusion
Transplanting Aerogarden tomato plants is a relatively simple process that can be done in a few easy steps. With the right soil, potting mix, and location, you can successfully transplant your Aerogarden tomato plants and enjoy the delicious, homegrown fruits of your labor. As long as you provide the plants with the right growing environment, you should have success with your Aerogarden tomato plants.


5 Comments